This article is Part Two in a series on architectural rendering, crafted with aid from a few professional architectural visualisation studios.
In Part One, ‘The perfect render: tips from an Architectural Visualisation expert’, digital artist and Archviz expert Christian Behrendt shared his advice on how to get your 2D drawings ready for rendering and how to apply textures to your project.
In Part Two, Behrendt shows how lighting, rendering and postwork can make or break your 3D digital architectural model.
LIGHTING:
Lighting offers immeasurable possibilities to enhance an architecture model, says digital artist and Archviz expert Christian Behrendt, and a well-crafted lighting design can help guides viewers eyes to right places and create emotion in your project.
“If you light the building “flat out” it's not only boring to look at, but you need more time to understand its shape. However, if you underline the shade by placing the shadows correctly, you instantly can see what’s going on,” he says.
“Another obvious part of lighting is creating emotion. Depending on what you're trying to achieve you can introduce a lot of colour into your rendering, which greatly influences the overall mood of the image. In correspondence with that a lower sun angle for example also provides longer and more dramatic shadows for example.”
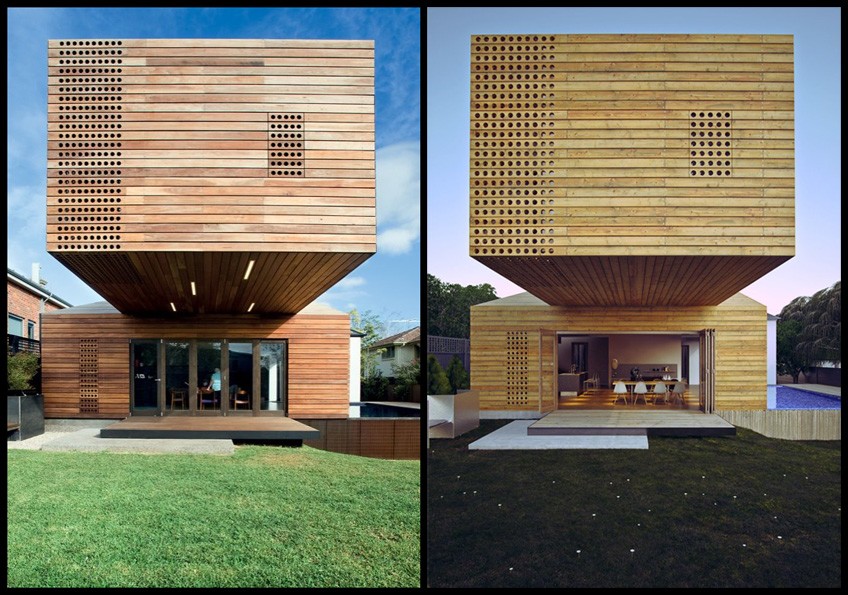 Lighting program V-Ray has a Physical Sky feature which allowed Behrendt to achieve a sky colour and brightness according to the house’s Melbourne location. On the left is the real project “Trojan House” by Jackson Clements Burrows architects, on the right is Behrendt’s recreation. Photography by Emma Cross.
Behrendt pointed to the new concept of IES light files which are produced by lighting companies and downloadable for use in CAD and 3D modelling programs.
“A lot of companies producing lamps also provide IES-profiles for their products which can be directly used in the 3D-application for a perfect representation of that lamps illumination,” he explains.
“Especially with the recent advances in rendering technologies, IES files help you create stunningly realistic renderings which can be of great use for lighting planning.”
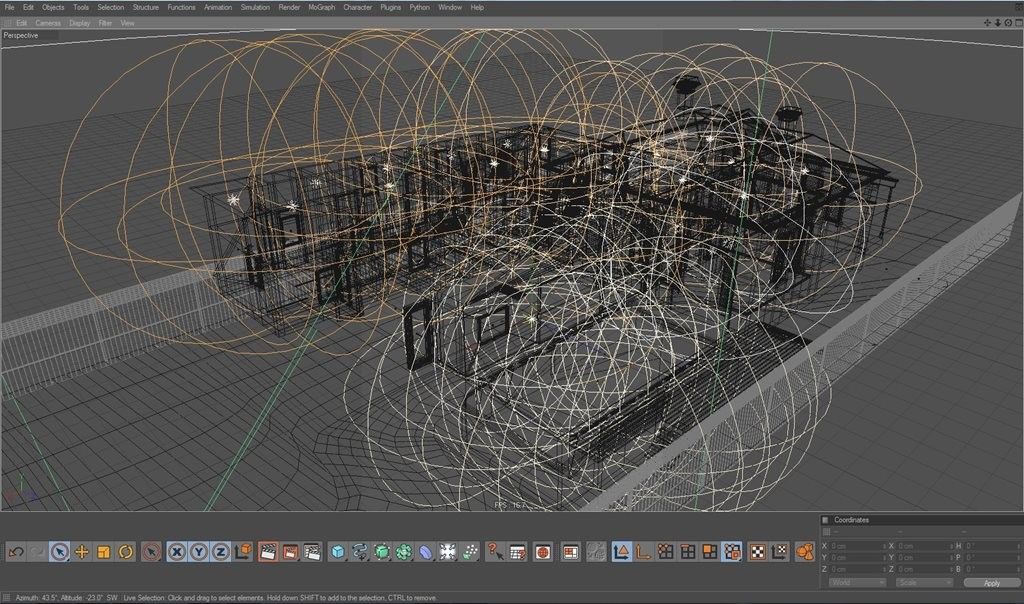 "I always try to imitate lighting situations as real as possible and with V-Ray this works like a charm because of the very good indirect illumination. You can just use real world values and then adjust your lights accordingly. For light sources that will be seen by the camera I tend to use mesh-lights, for light sources that won’t be seen I mostly use area lights set to sphere mode to imitate light bulbs."
RENDERING:
All rendering programs have their pros and cons, says Behrendt, however the biggest advances in programs in recent times has to be the transition from Central Processing Units (CPUs) to Graphics Processing Units (GPUs) in rendering platforms.
“GPU rendering is quicker so it provides much faster feedback than traditional CPU renderers,” says Behrendt.
“This is great for an architect or designer trying out different materials for a design in a meeting with a client for example.”
“However they currently have some limitations which can be painful in production, so CPU renderers still are used widely.”
Behrendt recommends TIFF and OpenEXR output formats; TIFF for stills and OpenEXR for animations; however he said the most important consideration when rendering your file is to consider its depth.
“The most important thing to is to save your files with a depth of 32bit as it gives you a lot of flexibility in postwork as you have much more information stored in 1 pixel.
“You can crank up or lower your exposure significantly with a 32bit image whereas an 8bit image lacks this information and will turn out flat.”
POSTWORK
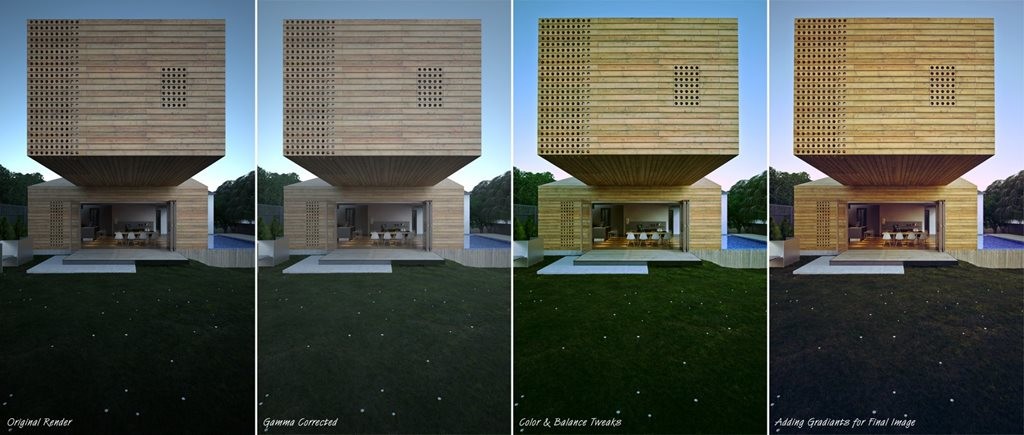 Behrendt always changes his gamma ranges in Photoshop to 2.2 gamma and adds lens distortion, vignetting and chromatic aberration effects to mimic real world cameras and photos.
Behrendt says the amount of postwork is dependent on the amount of detailing the render went through at texturing and lighting stage.
“There are a lot of artist which only do a basic rendering, so they get the perspective and the building right, and then for example do a lot of their texturing in Photoshop,” he says.
“These images can look stunning, and can take a lot of your shoulders for example at the stage of material creation.”
Colour correction is a big part of Behrendt’ s work and he says it’s better suited to postwork as it can be tedious trying to get everything right within the modelling process.
A final tip from Behrendt in getting a photo-real image is to use a wide range of brightness levels and to replicate some of the common camera lens imperfections within Photoshop.
“Although there are certain exceptions, in general you should try to use the whole bandwidth of brightness levels you have at your disposal or otherwise your image might end up looking flat.”
“Finally, what I like to do is also trying to replicate some lens imperfections.”
“Slight distortion and colour fringes called "Chromatic Aberration" can help you make your image look like it was taken on a real camera, which helps to get away from a to clean look which some renderings tend to have.”
